+ Reply to Thread
Page 6 of 10 FirstFirst ... 45678 ... LastLast
Results 51 to 60 of 97

Thread: My Third “Techie” – well the last of them!

  1. #51
    Join Date: Jan 2013

    Location: Carlisle - UK

    Posts: 1,984
    I'm Ken.

    Default Update


    Started the veneering process, it's American Black Burr Walnut.
    Spent ages thinking about how the pieces would be cut from the sheet. I ended up making paper templates and laying them out on the sheet, just to make sure they would all fit butted up together, this was essential to get a continuous grain pattern over the surfaces. When it was all laid out I only had 50mm extra veneer on the length and 5mm on the width so no room for error. I found the Burr much harder to work with than ordinary Walnut, it's brittle and cracks easily.


    Got a few more pieces on, the pattern running across the panels seems to work well so it was worth the effort.
    I previously used iron on veneer that had the hot melt glue already applied to the back, it was a creamy yellow in colour and I found it difficult to disguise the joint lines on edges, especially noticeable on darker woods.
    This time I used plain veneer and a separate sheet of clear EVA hot melt, that came on a backing sheet. You tack it to the back of the veneer with an iron, peel off the backing and iron it on to the job. The film of glue is a lot thinner and combined with the clear colour makes a neater joint.
    The wood grain looks drab at the moment, eventually it will get a coat of Danish oil. which will really lift the colour.

  2. #52
    Join Date: Sep 2010

    Location: High Peak, Derbyshire

    Posts: 2,241
    I'm Keith.

    Default

    This is gonna look fabulous Ken
    Keith
    Analogue: Lenco L75 with 'PTP5' top plate in heavy birch ply plinth/re-wired Rega RB300/SAE 1000e HOMC Cartridge/Trans-Fi Reso-Mat/Moth RCM
    Files: Voyage MPD/Custom PC/Supra USB/Beresford ASYNCH-1/Beresford TOSlink cable
    CDP: Inca Katana SE
    DAC: Beresford Caiman MkII (LiPo Battery powered)
    Pre-Amp: Croft Micro 25 Power-Amp: Croft Series 7
    Speakers: DIY Frugel-Horn Mk3 ('FH3') + REL Strata subwoofer
    Headphones: Beyer Dynamics DT990 Pro (250 ohm)/Schiit Asgard Headphone Amp
    Cables - Interconnects: Mark Grant G1000HD Speaker Cables: Van Damme Blue
    Mains: Belkin PF30/Mark Grant DSP2.5 & DSP1.0 Rack: Target

    Office System: HP Win8 Laptop/JRiver/MF V-Link2/Beresford Bushmaster MkII/Topping TP20 Mk2/Mission 771e
    Bedroom System: Raspberry Pi/Raspbrian + MPD/HiFiBerry DAC/Topping TP20 Mk2/Mission 760i or DIY Hybrid Valve-MOSFET Headphone amp + Sennheiser HD595


    Gallery

  3. #53
    Join Date: May 2008

    Location: Lancaster(-ish), UK

    Posts: 16,937
    I'm ChrisB.

    Default

    I think we will all be stunned by how that will look after oiling. Make sure you put some real elbow grease into burnishing the last coat of oil - effort there pays real dividends.

  4. #54
    Join Date: Jan 2013

    Location: Carlisle - UK

    Posts: 1,984
    I'm Ken.

    Default

    Chris - yes plenty of elbow grease used already. I am going to use Rustins product line and start with their neutral grain filler thinned with their Walnut stain rather than turps to get a colour match (their recommendation) then after rubbing down (again) several coats of Danish oil to penetrate the wood and lift the colour. The final top coat, subject to a test piece proving compatible will be Rustins Plastic Coating. This is a clear varnish with a catalyst activator; it sets rock hard in 2 hours. This coating is designed for furniture, dinning tables etc and they even do a rubbing compound for it so it can be burnished to a mirror finish. That's the plan anyway, subject to no reaction with the Danish oil, this should give a very durable finish.
    Last edited by Qwin; 18-04-2014 at 15:30. Reason: Spelling

  5. #55
    Join Date: May 2008

    Location: Lancaster(-ish), UK

    Posts: 16,937
    I'm ChrisB.

    Default

    My preference would be to leave the oil as the top coat but just work it and work the bejeezus out of it, to get the required finish but that's just a reflection of my personal feelings about wood. A plastic coat is much more practical I know.
    Either way, it's going to look fantastic!

  6. #56
    Join Date: Jan 2013

    Location: Carlisle - UK

    Posts: 1,984
    I'm Ken.

    Default Update


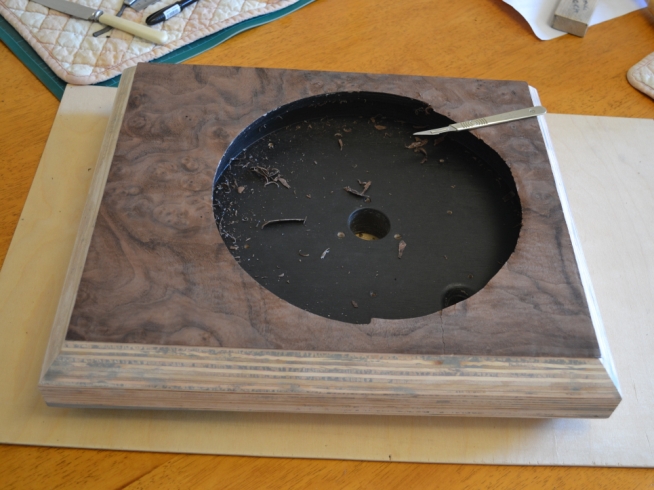
    That's the veneer all done, the pattern wraps round to, and includes, the underside chamfers, the base will be Black to match the well. This has had a second coat to cover up my scrapings, made when trimming the veneer around the aperture. I will have to leave it for now as the grain filler won’t be delivered till after Easter and it really needs it. The burr veneer has cracks and pin holes, which are part of its make up, they will all have to be filled before oiling.

  7. #57
    Join Date: Oct 2011

    Location: Charente, France

    Posts: 3,531
    I'm Nodrog.

    Default

    Quote Originally Posted by Qwin View Post


    That's the veneer all done, the pattern wraps round to, and includes, the underside chamfers, the base will be Black to match the well. This has had a second coat to cover up my scrapings, made when trimming the veneer around the aperture. I will have to leave it for now as the grain filler won’t be delivered till after Easter and it really needs it. The burr veneer has cracks and pin holes, which are part of its make up, they will all have to be filled before oiling.
    Nice bit of grain matching there - looks great. Looking forward to seeing this finished.

  8. #58
    Join Date: Oct 2013

    Location: Wrexham

    Posts: 1,058
    I'm Darren.

    Default

    Darren.
    Listening Room.
    UNDER CONSTRUCTION
    Turn Table. Garrard 401, Reso Mat, 2 Tier Slate Plinth, DIY Hadcock GH242, Nick G modded Lentek, Denon DL-103.
    Pre Amp. Croft Super Micro2. Power Amps Quad 405 Mono Blocks.
    Speakers. TBC

    Home Cinema.
    UNDER CONSTRUCTION
    DAC/Pre Amp. Denon AVC X3700H.
    BDP/Streamer. Panasonic DP-UB820EB / Apple TV4K.
    Display. Optoma UHD51 / DIY False Black Window Screen.
    Power Amps. 2 x Nakamichi AVP1.
    Front Speakers. DIY Baby Celestion Ditton 66. Surround Speakers. Celestion Ditton 11. Subwoofer. BK Electronics P12 300SB PR.

    Old Gallery. http://theartofsound.net/forum/showt...-of-the-70%92s

  9. #59
    Join Date: Jan 2013

    Location: Carlisle - UK

    Posts: 1,984
    I'm Ken.

    Default Update

    I nearly balls’d up the veneer

    I hadn’t read the instructions fully for the filler/dye.

    You only add the dye to the grain filler if you are going to dye the whole thing afterwards, which obviously I'm not, don't want to degrade the nice natural look of the wood. Good job I did a tester before I tackled the deck, it stained the wood around the filler. If I’d scrubbed the filler across the grain it would have coloured the veneer. The filler is too light in colour to use out of the tin.

    No harm done - I will do what I've done in the past – Give the whole deck a good coat of Danish oil to bring out the colour and sink deep into the wood, keep applying it till it stops soaking it up then wipe off any surplus and let this dry fully overnight at the very least. Then put some Danish oil on the veneer and rub with some fine wet or dry abrasive till it works up a paste from the wood, then use this to fill the grain. Let it dry for 24hrs then rub down with some very fine wet or dry and a little Danish oil to remove any smears of paste and clean off with a lint free cloth. Finish with a couple of coats of Danish oil. When dry you can add Polyurethane varnish on top if you want a deep gloss finish, or leave the Danish for a more natural look. I will be using a two pack catalyst varnish over the Danish which dries very hard and tends not to sink over time. It can also be polished with rubbing compound, so any minor scuffs picked up during use can be polished out. You can't use rubbing compound/T-Cut on Polyurethane varnish.
    Last edited by Qwin; 27-04-2014 at 16:17.

  10. #60
    Join Date: Jan 2013

    Location: Carlisle - UK

    Posts: 1,984
    I'm Ken.

    Default Update


    The deck has had a couple of coats of Danish Oil applied with a lint free cloth and it certainly brought out the colour. This shot was taken outside and it still looks quite vivid, indoors the darker grain looks almost Black.
    One more coat and it will be ready for the varnish - trying for a piano finish on this one.

+ Reply to Thread
Page 6 of 10 FirstFirst ... 45678 ... LastLast

Posting Permissions

  • You may not post new threads
  • You may not post replies
  • You may not post attachments
  • You may not edit your posts
  •