+ Reply to Thread
Page 3 of 10 FirstFirst 12345 ... LastLast
Results 21 to 30 of 97

Thread: My Third “Techie” – well the last of them!

  1. #21
    Join Date: Jan 2013

    Location: Carlisle - UK

    Posts: 1,984
    I'm Ken.

    Default Update


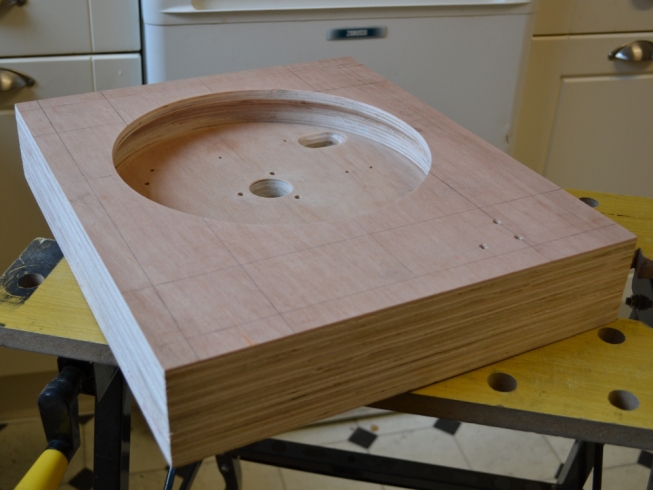
    With the top section glued in place you can see the undercut on the main aperture.
    I've squared up the sides with a plane and sanding block, I would have cut the chamfers that are marked out but its raining and I have to do this outside.


    As rain has stopped play, I did a test fitting of the bearing and platter.
    It sits square as it should with a 5mm gap all round, the gap will come down to 3.5/4mm when the veneer and lacquer are applied. The smaller hole in the top sheet of ply has worked and you can't see into the well.

  2. #22
    Join Date: Jan 2013

    Location: Carlisle - UK

    Posts: 1,984
    I'm Ken.

    Default Update


    Managed to cut the chamfers, the hand held circular saw I used was a bit blunt but it eventually chewed its way through. It's about ready for a trial build and a check on the scales for how the weight is distributed.

  3. #23
    Join Date: Dec 2013

    Location: Finland

    Posts: 30
    I'm Samu.

    Default

    Hi Ken

    Great looking project and I´m really inspired b your work!

    At the moment I´m building my second techie plinth also out of plywood. Although mine will have the original top plate and the plywood is just the outer shell of the plinth and thought of filling it with concrete like your first techie. I will start my own thread of my techie projects in time but the plywood inspired me when working with the first one and had to do the second in the meantime when my first ones top plate painting is done. Next phase is PSU and reg building with your pcb´s Plywood is really sturdy and its possible to get plain plywood looking really nice with some wood wax.

    What kind of finish are you going to put on this one?

    -samurasa

  4. #24
    Join Date: Oct 2012

    Location: Napier, New Zealand

    Posts: 1,519
    I'm Andrei.

    Default

    Quote Originally Posted by Qwin View Post
    Managed to cut the chamfers, the hand held circular saw I used was a bit blunt but it eventually chewed its way through.
    Andrei: Do me a favour Ken.
    Ken: Sure, what?
    Andrei: Count your fingers.
    [COLOR=#a52a2a][B]Sources:[/B] [B]1[/B][/COLOR] PC & Wyred4Sound DAC-2 DSDse   [COLOR=#a52a2a][B]2[/B][/COLOR] Oppo BDP105   [COLOR=#a52a2a][B]3[/B][/COLOR] Technics SL·1210 MK5 (Jelco 750D · Benz Wood).    [COLOR=#a52a2a][B]Speaker Cable[/B][/COLOR] [COLOR=black]Nordost Frey.[/COLOR]    [COLOR=#a52a2a][B]Interconnects [/B][/COLOR][COLOR=#000000]Oyaide[/COLOR][COLOR=black] & [/COLOR][COLOR=#000000]Geisha [/COLOR][COLOR=black]Silver.
    [/COLOR][B][COLOR=#a52a2a]Phono Stage [/COLOR][/B][COLOR=black]Fosgate Signature V2. [/COLOR]   [COLOR=#a52a2a][B]Preamp [/B][/COLOR][COLOR=#000000]Ayon Eris[/COLOR][COLOR=black]. [/COLOR]   [COLOR=#a52a2a][B]Power Amp[/B][/COLOR] [COLOR=Black]ATC P1. [/COLOR]  ​ [COLOR=#a52a2a][B]Speakers[/B][/COLOR] Triangle Magellan Cello.     [COLOR=#A9A9A9]Oh Sting, where is thy death?[/COLOR]

  5. #25
    Join Date: Jan 2013

    Location: Carlisle - UK

    Posts: 1,984
    I'm Ken.

    Default

    Hi Samurasa

    Look forward to seeing your project.

    The PSU and Regulator make a big difference, you wont be dissapointed in what they do.

    One of the reasons (There were many) that I went for plywood this time was to keep the weight to reasonable levels so that I could use Isonoe feet. Concrete would have been way to heavy for them.

    I ordered some veneer today for mine - American Black Burr Walnut triple A grade, its about ten times more costly than anything else I have used and there will be just enough to do the job, so it has to be right first time. Bit nervous about using it as the panels all fit in one particular pattern and one wrong cut into an overlapping piece will ruin it. I plan on matching all the grain on all four sides and right round to the base. If you could imagine a cloth laid over the deck with the sides all tucked underneath thats the effect I am trying to achieve but from the rigid sheet. It should look like the plinth is one solid piece of wood if done right, the Burr pattern will take on the depth of the deck and become three dimensional. Well thats my plan anyway.

    I have found a different source for my veneer and the hot melt adhesive comes as a seperate sheet and is clear so it shouldn't show at the joint lines. The previous iron on I used came pre glued with a yellowish hot melt. It's a real pain to get a clean joint with this, without a witness line showing along the edge, particularly on darker woods like Walnut.

    I am contemplating how to finish it, either Danish oil topped with Polyurathane Varnish. Or cellulose sanding sealer topped with Acrylic Lacquer.

    The Lacquer gives a very clear and deep shine, which can have any light scratches it pickes up during its life polished out with auto restoration products.

    The Danish/Poly gives a rich colour but is difficult to repair and can't be buffed up.

    I seem to learn new skills every time I tackle one of these projects and I do like to push the boundary's.
    Last edited by Qwin; 31-03-2014 at 23:40.

  6. #26
    Join Date: Jan 2013

    Location: Carlisle - UK

    Posts: 1,984
    I'm Ken.

    Default


    Nice one Andrei - came through unscathed, but did manage to stick a scalpel in my finger this afternoon while trying to trim a splinter in the ply and eat a pie at the same time. No harm done - the pie was not hurt.

  7. #27
    Audio Al is offline Pishanto Specialist & Super-Daftee
    Join Date: May 2012

    Location: Dagenham Essex

    Posts: 11,215
    I'm Allen.

    Default

    Lovely Jubbly

    Nice inspiring projects you do Sir
    [

  8. #28
    Join Date: Jan 2013

    Location: Carlisle - UK

    Posts: 1,984
    I'm Ken.

    Default

    Thanks Al

    I would like to think I've shown a few alternative things that can be done to a Techie and at reasonable cost.

    It takes time to put the story together with pictures etc but I think its worth it, as I remember when I started modding, the projects on the web forums were my insperation and I learnt a hell of a lot by watching other peoples efforts come together.

  9. #29
    Join Date: Jan 2013

    Location: Carlisle - UK

    Posts: 1,984
    I'm Ken.

    Default Update


    I struggled to find a piece of hardwood to make the spacer for the Tone Arm and postage prices for a web purchase would be expensive. I ended up buying a small, end grain chopping board from Argos (Ł8.99) my branch is only a couple of miles away. It was exactly the right thickness and the grain orientation means it is very strong under compression, which is ideal for the spacer so I cut a piece from that. I routed two slots for the bolts, this allows me to take advantage of the full 20mm cartridge adjustment in the head shell, I can have the cartridge in any position and still get the alignment correct due to the adjustment available in the new front to back base slots on the Arm, they previously ran left to right. Having slots, rather than holes in the spacer means it can move with the arm and always keep the same relative position for cosmetic purposes.
    Last edited by Qwin; 03-04-2014 at 10:00.

  10. #30
    Join Date: Dec 2013

    Location: West Yorks

    Posts: 18
    I'm Lee.

    Default

    Lovely work as usual, Ken.

+ Reply to Thread
Page 3 of 10 FirstFirst 12345 ... LastLast

Posting Permissions

  • You may not post new threads
  • You may not post replies
  • You may not post attachments
  • You may not edit your posts
  •