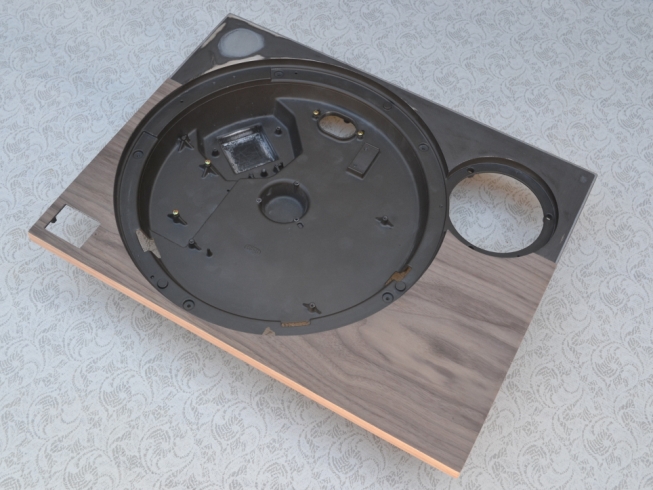
This is my second Technics deck. The purpose of this project is to build a deck for my Girlfriend. She has no knowledge of turntable set up etc and just wants a reliable manual deck she won't have to fuss with. My aim is to apply simple, low cost modifications to produce a good quality reliable deck for her. This is the donor deck purchased off fleabay for £150.

The first step was to fill the unwanted holes where the DJ features used to be. Nothing fancy, just filled them with Plastic Paddings "Chemical Metal" I didn't even strip the paint off the deck, just roughened the surface with some coarse sand paper. The hardest part was filling the small edge chamfers to create a square edge for the veneer.

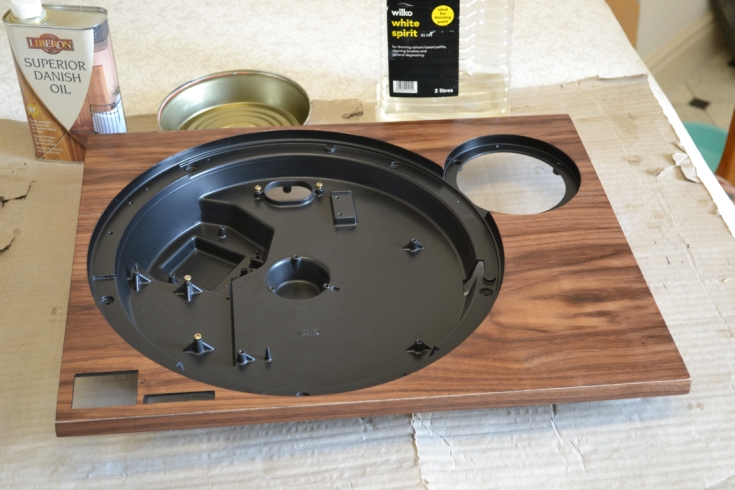
Started to apply the veneer, it was left over from my first Technics project and is American Black Walnut. Because I was using left over pieces, the top had to be made from three separate bits of veneer.
The veneer went on well. Can you spot the joins?

I gave the motor well and arm location a coat of Black acid etch primer just to freshen it up.

The first coat of Danish Oil applied (Natural no stain). When this dries the grain will be filled, prior to applying a couple of finishing coats of the Danish oil.
Moving on to the Tone arm, I decided to modify the existing arm rather than buy an alternative. The Technics headshell has an offset angle of 22 degrees but this is only correct for their own alignment geometry. If you calculate for Baerwald alignment it requires an offset of 23.7 degrees so you have to twist the cartridge in the mounting slots.
The Linn LV-X headshell is at an angle of 24 degrees, the 0.3 degree difference over my preferred Baerwald figure of 23.7 is so small as not to be noticeable by eye, plus the cartridge mounting slots will easily allow for this. I will of course be setting the cartridge to the correct angle using a suitable Baerwald protractor.

The picture on the left shows the (Rare) brand new headshell I picked up off eBay. Got it for a price, below what I've seen second hand ones go for, so well pleased. The picture on the right shows the headshell after I have stripped out the multi pin connector and cartridge leads. One of the things I like about this headshell is that the connecting stub is not a separate piece, but part of the die casting. This removes a mechanical fixing interface, which I am all in favour of. Another key attribute is that the stub is 8mm diameter, I plan on making a straight arm from roll wrapped carbon fibre tube, OD 10mm x ID 8mm, so the stub should fit with a bit of persuasion. Also the stock bearing yoke which accepts the arm tube has a 9.5mm hole, so I should be able to work a way of fixing the tube in there as well, enlarging the hole with a 10mm drill or sanding the outside of the tube, or a bit of both.

One of the first things I've done is to fill the balance weight stub with Black Silicone sealant. I had to alter the metal threaded bracket that normally covers the opening to allow this. Its basically a threaded insert, a right angle piece of metal, with a threaded hole in each limb. One hole to take the fixing screw that retains the copper tag on the underside of the stub and the other on the end of the stub to take an additional threaded weight. I simply cut off the portion of the bracket that blocked the opening of the stub and left the rest to do its job of retaining the copper tag which holds the large main weight in place.
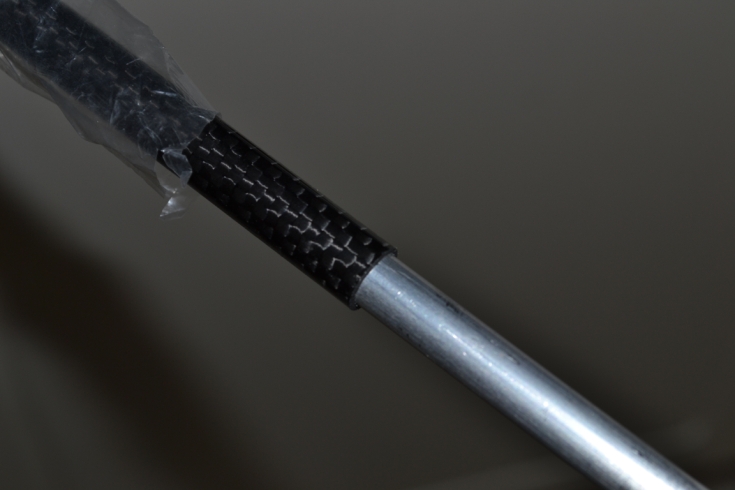
The roll wrapped carbon fibre tube is much more rigid than a pulltruded tube. It is 10mm O.D. x 8mm I.D. I glued an 8mm O.D. x 6mm I.D. Aluminium tube inside the Carbon tube, it was a very tight fit and I needed a hammer to drive the last 30mm home.

The components were dry fitted so I could work out the length of tube required. I did this by fitting a cartridge in the centre of the adjustment slots on the headshell and tried lining the stylus up with the arc on an alignment protractor. I just kept sanding a bit at a time off the tube on a belt sander, till the length was right to make the alignment. I then glued the tube into the bearing yolk. Once this had dried I levelled the table and placed a block of wood under the arm. I adjusted the VTA till the arm was perfectly level then glued the headshell in place making sure it was level in all directions and therefore parallel to the platter.

Completed Arm. It certainly looks the part, all it needs is a single length of Cardas wire from headshell to Phono stage and its ready to try out. The mass of the arm/headshell worked out well at 22g. The Technics arm/headshell weighs 24g, so not much difference. The combination of Carbon/Aluminium tube is much better than carbon on its own which would have come in at 13g including headshell. Where the difference lies is in the distribution of the mass. The Technics is 24g but 16g is hung off the end in the form of headshell and connector. The tube itself weighs only 8g. With this modification the mass is more evenly distributed along the length, 5g for the headshell, 17g for the tube.

This is the Cardas cable I used to wire the Tone Arm.
It's 33awg litz copper made up as twisted pairs then wrapped in PTFE, this bundle (1.5mm dia) is then covered with a tinned copper braid and finally a soft flexible jacket making an overall diameter of 3mm.

The jacket, coax shield and PTFE wrap were stripped off the length of cable running inside the arm, it wouldn't be flexible enough otherwise. An additional strand of wire was run through the arm for grounding, it's connected to the screw on the right which is threaded into the conductive carbon wand and the stub of the headshell. The other screw is threaded into the carbon and the inner Aluminium tube, so all the elements are grounded, this was confirmed when checked for continuity.
The additional ground wire plus a length of equipment wire were soldered to the coax braid inside the base of the Tone Arm. The joint was tidied up with some heat shrink sleeving and the cables tied down using "P" clips at the screw bosses originally used to hold down the small PCB. The base cover plate and cable retaining block would be fitted as normal, the thick cable containing the cartridge leads was left long enough to reach the Phono stage and the single piece of equipment wire runs to the TT grounding point at the corner fixing of the main PCB.

The ends of the phono lead were fitted with chuck type plugs. I separated the individual twisted pairs and applied red and black heat shrink. The diameter of the leads required increasing to work with the crimp retaining feature on the plug, I did this by applying several layers of heat shrink. The braided screen was terminated with a piece of equipment wire and a loop solder tag, again heat shrink applied at the three way junction to tidy it up and strengthen the joint.
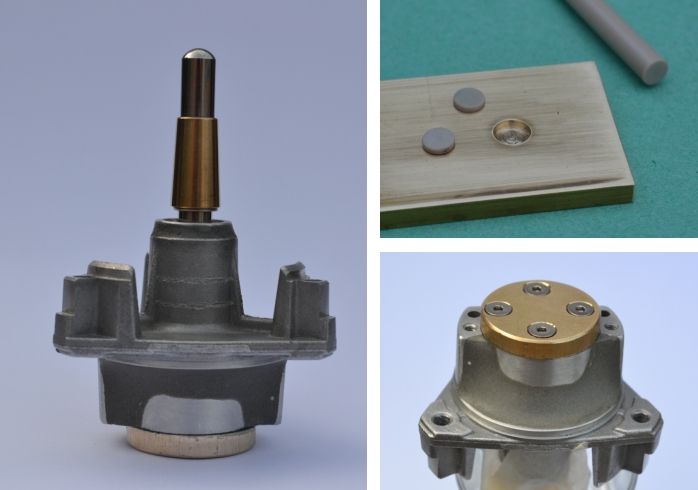
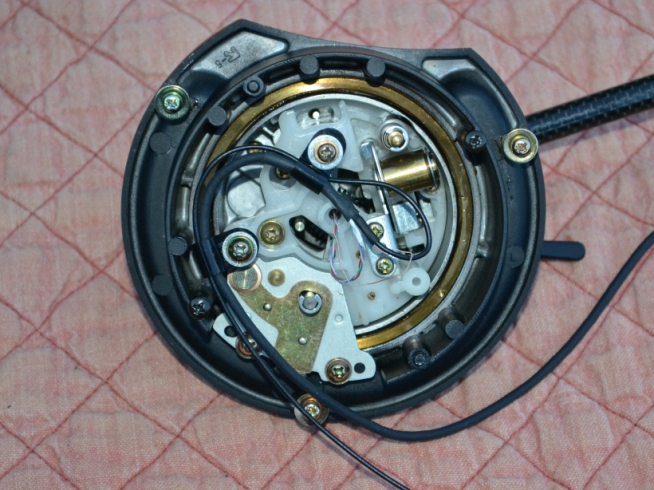
The Deck was treated to one of my modified bearings which has the bush and thrust pad running in oil. This mk II version has a thrust pad made from PEEK and the end cap is solid brass with a pocket made using an end mill cutter in a pillar drill. Instead of a paper sealing gasket for the cap I used spray on gasket.

The Deck also received an external PSU and upgraded Regulator as per 6L6s design.

I removed the stock feet and replaced them with 50mm diameter Sorbothane semi-spheres.
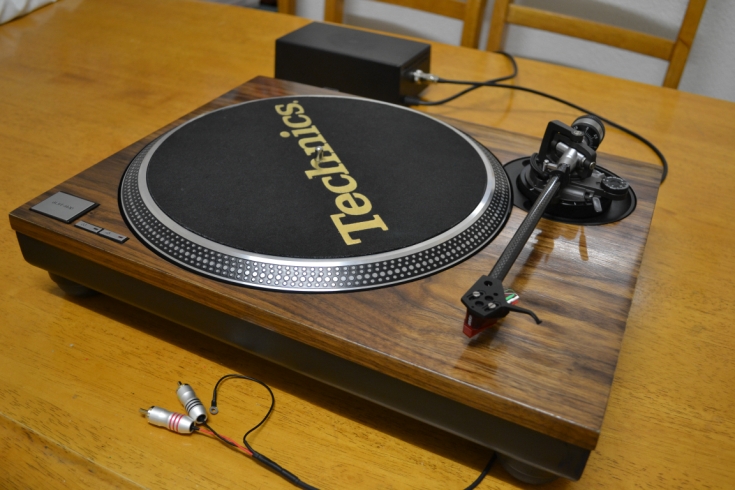
The platter was fitted and she's ready to try out.
I really like the simplicity of this decks appearance.

She fired up without any problems.

I think the finished article looks really smart, all I need now is a dust cover. I don't use one myself, but like I said, this deck is for my girlfriend and she wants one fitting.

I hope this will give some inspiration to other budding modifiers, it has an upgraded Bearing, PSU, Regulator and Arm and including the purchase price of the deck and the arm re-wire has cost less than £320 in total to reach this build level.


Originally Posted by Qwin
 This is my second Technics deck. The purpose of this project is to build a deck for my Girlfriend. She has no knowledge of turntable set up etc and just wants a reliable manual deck she won't have to fuss with. My aim is to apply simple, low cost modifications to produce a good quality reliable deck for her. This is the donor deck purchased off fleabay for £150.
 Reply With Quote
 , I like the wood actually it makes a nice change from the norm

