+ Reply to Thread
Page 10 of 29 FirstFirst ... 8910111220 ... LastLast
Results 91 to 100 of 284

Thread: SL-1200 DC Power Supply DIY

  1. #91
    Join Date: Jan 2013

    Location: Carlisle - UK

    Posts: 1,984
    I'm Ken.

    Default

    I’ve decided to have a go at making the PCB. I first considered the laser thermal transfer system, this is ok for a crude PCB with wide tracks, but is not accurate or reliable enough for such fine work. I decided to use UV sensitive pre coated boards. This is the artwork for it. I printed two copies onto overhead projection sheets using my laser printer. These were glued together to make certain the tracks were solid enough for the light not to penetrate. 8 PCB's will fit on a 100 x 160mm board. I will document my progress and keep you updated as the process may be of interest. Though there are some good tutorials on YouTube, which is what I am using as a guide.


  2. #92
    Join Date: Aug 2012

    Location: Denver, Colorado

    Posts: 458
    I'm Jim.

    Default

    That looks wonderful! Thanks for the update.

  3. #93
    Join Date: Jan 2013

    Location: Carlisle - UK

    Posts: 1,984
    I'm Ken.

    Default Update

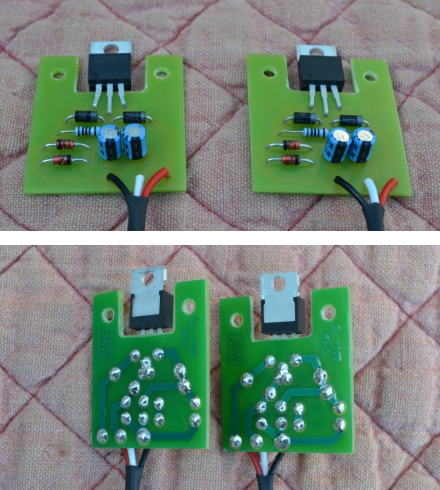
    I completed my PCB for the Regulator part of this power supply project.
    I worked with Jim on this and it is based on his earlier sketched schematic.
    There is an additional 1N4002 diode incorporated for protection and the 240 Ohm resistor was reduced to 100 Ohm as recommended by Neal. The 19.2v of Zener is made by using an 11V and an 8.2V in series.


    I made a pair as I have two Technics Turntable projects in development.

    The board locates using the stock screws and spring clip for the regulator. If you make something like this for the stock deck, you will have to use an Aluminium spacer and longer screws, put the spacer between the die cast platform and the board. This is to raise the board above the level of the main cable entry aperture, the raised lip on this aperture will short out the tracks on the PCB otherwise as they overlap. This LM317 regulator also needs an insulating gasket between it and the metal surface of the deck/spacer.

    If you are interested in how you make a PCB you can see how I made this, my first effort, here:

    http://www.jkwynn.co.uk/////PCB_HTML/PCB_Thumbs.html

  4. #94
    Join Date: Aug 2012

    Location: Denver, Colorado

    Posts: 458
    I'm Jim.

    Default

    Looks fantastic! Wow!

    Test them for proper voltage before installing them in the TT.

  5. #95
    Join Date: Jan 2013

    Location: Carlisle - UK

    Posts: 1,984
    I'm Ken.

    Default

    Whats the best way of testing the output?
    Hook it up to the PSU direct and measure the output before fitting to the deck?

  6. #96
    MartinT Guest

    Default

    Quote Originally Posted by Qwin View Post
    Hook it up to the PSU direct and measure the output before fitting to the deck?
    Yes, that will give you the unloaded 21V output. Then test the voltage again when under load (i.e. platter rotating) where there should be only a small voltage drop if the regulator is working correctly.

  7. #97
    Join Date: Jan 2013

    Location: Carlisle - UK

    Posts: 1,984
    I'm Ken.


  8. #98
    Join Date: Mar 2013

    Location: London , UK

    Posts: 18
    I'm Richard.

    Default Thank you ....

    Thanks Jim and the others for your help. The case is something I've had sitting around for ages . Finally found a use for it . The front is a bit of Corian - something ill be using more often I think ..... I guess the Reg mod is next :

    Richard .
    Attached Images Attached Images

  9. #99
    Join Date: Aug 2012

    Location: Denver, Colorado

    Posts: 458
    I'm Jim.

    Default

    Rich - that looks fantastic! Bravo!

  10. #100
    Join Date: Mar 2013

    Location: London , UK

    Posts: 18
    I'm Richard.

    Default

    Quote Originally Posted by 6L6 View Post
    Rich - that looks fantastic! Bravo!
    Thanks again . I have room to put the Reg in here ..... I have 4 core and 2 ground in the umbilical ..... Can I use them for the Reg ?

    Once the design is finalised ofcourse
    Attached Images Attached Images

+ Reply to Thread
Page 10 of 29 FirstFirst ... 8910111220 ... LastLast

Posting Permissions

  • You may not post new threads
  • You may not post replies
  • You may not post attachments
  • You may not edit your posts
  •