BOOTIFUL!!!

BOOTIFUL!!!
 Trade: RFC
Location: Gloucestershire
Posts: 3,377
I'm Paul.
As no-one's yet jumped in I thought I'd throw my hat into the ring with the refurbishment of the Garrard 401, including full strip-down and the design and construction of a new plinth (which has since gone on to be marketed):
It started with a late model 401 given to my by my late father-in-law. It had never been serviced and was in a bit of a sorry state needing attention. I built a rudimentary plinth for it and used it for a year or so before deciding I needed to bite the bullet and do the job properly. here is what it looked like in pinth #1
Underside of the old plinth. Holding down screws for the motor were loosened from the top, and the spindle bearing housing bolts removed and the spindle bearing removed. The bolts were removed from the top housing for the spindle and the spindle removed:
Flat worn on thrust bearing:
I decided to replace this with a phosphor bronze bearing instead and replaced the gaskets at the same time. The spindle was cleaned in IPA and re-oiled before inserting back into the housing which had also been cleaned out (including main bushing). Wear to shaft body seemed non-existent after 40 years!
Next came motor strip down. Motor clam shell retention springs and clamp removal:
Bottom clamshell removed to expose motor and spindle:
As expected, the bottom bearing was dry as a bone but surprisingly with little wear. the spherical bearing housing (which moves to facilitate correct spindle alignment) had seized so needed to be freed up.
Bottom bearing re-oiled ready fro re-assembly:
Bottom bearing reassembled and clamshell replaced, Deck turned over and the elt washer at the top of the motor cleaned off to remove what little varnishing had occurred and re-oiled to lube the top bearing.
Photo of replacement spindle bearing with an old bearing shown alongside:
Deck re-assembled, new earth lead soldered to chassis spade, idler bearing re-lubed (wheel was fine) and inside of platter cleaned with IPA.
Next was the start of the new plinth. I had decided to mount the chassis on sorbothane rather than bolt it so tested various shore hardnesses before settling on 50 Shore:
Template for new skeletal plinth cut out:
I decided that I'd like the deck flush with the top of the plinth, so the intention was to route out the Oak I would be using to accommodate the sorbothane mounts and cut the mounting platform into the top plinth. If I later change my mind and want to bolt the plinth in, I will use rubber spacers and sit the tonearm on a sorbothane sheet instead.
Picture of top and base plinths cut and mounted. I used American Black Walnut and turned the legs up, and fitted the leg bases with brass adjustable spikes which locate into cups set into the base plinth. The plinth is shown cut, routed and sanded down ready for a final lacquer:
Close up of leg detail:
Plinth received several coats of lacquer, and deck fitted into it, sat directly on the Sorbothane. Hole cut out for tonearm. I replaced the sme3009 with a Hadcock GH242 full cryo version. Deck as completed!:
In service!:
It now runs super-smooth and is very quiet. I think that I may try the bolting it down and sorbothane mounting the tonearm (need to cut out an arm-board for that, the lightly bolt it through 2mm sorbothane sheet to absorb any vibes from plinth).
Using the stacked coins trick, placing them on the chassis and lowering the stylus onto the coins, the amp volume has to be up higher than normal listening levels before I can pick out motor noise, so I'm pretty happy with how things now stand.
Detail of base plinth isolation from the Welsh Slate base that I have it sat on:

Fount Master & Moderator

Location: Essex
Posts: 32,041
I'm openingabottleofwine.
Thanks Paul - you are the first to reply!
Come on Guys, there are only 28 days left for nominations. If you don't want to nominate yourself for either of the two catagories, surely there must be other members whose work or thread contribution has impressed you?
Barry
Banned
Location: Lancaster(-ish), UK
Posts: 16,937
I'm ChrisB.
One rule that Barry forgot to mention:
Nominations submitted in mime will not be accepted!
Fount Master & Moderator
Location: Essex
Posts: 32,041
I'm openingabottleofwine.
Only three more weeks left for nominations.
So far we have had only one nomination and the promise of one more. Are there no examples of equipment refurbishment, or of DIY build, that have impressed you? Or of threads that have engaged your interest, found informative, or even amusing?
If none are forthcoming, we may have to abandon the whole idea - which would be a shame.
Last edited by Barry; 08-02-2013 at 18:33.
Barry
Deleted duplicate post
Last edited by synsei; 08-02-2013 at 04:20.
An observation: Perhaps the poor take up is due to this being aimed at a particular niche interest and not the general membership.
Banned
Location: Lancaster(-ish), UK
Posts: 16,937
I'm ChrisB.
It's two separate things and this bit's not too niche, Dave:
A fairly broad range of members could have an opinion here, don't you think?The second prize will be awarded for:
The most interesting thread started in the first five years of the Forum.
Senior Member
Location: The Black Country
Posts: 6,089
I'm Alan.
I was wondering whether to put forward my OTL project or not, as by my own admission my construction skills regarding metal bashing aren’t brilliant.
Given that there are very few submissions, and I have had some very good comments in the original thread I thought I would. Original thread here http://theartofsound.net/forum/showthread.php?t=20955
The Story
Comparing to many I am a very recent convert to all things tube based for high quality audio. I refrain from using the expression ‘high-end’ because that seems to imply (very) high cost also.
I have used a 405/2 for many years, not the best amplifier but reasonable performance. I became aware of the large interest in valve amplifiers and thought to myself I would dip my toe in by building one. The plan was if I didn’t particularly like it I would sell it.
After much research I settled on building an OTL, no expensive output transformers required and I had a lot of the Rs and Cs already.
Well never mind selling it, it was a definite improvement over the 405/2. As well as kick starting the further enjoyment of the music collection it also provided plenty of interest in valve audio circuits, particularly the plethora of OTL amplifiers built around the world.
As stated in the original thread I wanted to explore the use of alternative and cheaper valves.
I had a custom mains transformer wound with tappings included to facilitate some experimentation with the circuitry used.
The Case/enclosure
The one stumbling block I have when constructing new projects is the hardware, what to build it into. For some time the intention was to build it into an old Sony S/S amplifier case:
Whilst being of adequate size and with what I thought would be sufficient ventilation I was never very enamoured with the looks. Also I didn’t need the pre-amp and tone control section.
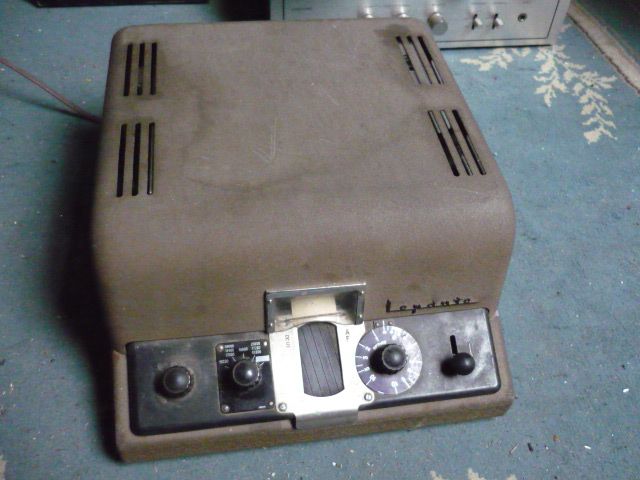
I kept my eyes open for something alternative and bought something from a boot sale. This is in the original state and as yet is still to be cleaned up:
Although it is very retro looking there isn’t a great deal of ventilation, particularly with a quartet of large output valves.
A friend asked me a to look at a piece of test equipment that turned out to be beyond repair, to my benefit. It didn’t strike me immediately but the case lent itself well to my OTL project, not least in being made of aluminium, for ease of fabrication, but also of modular construction.
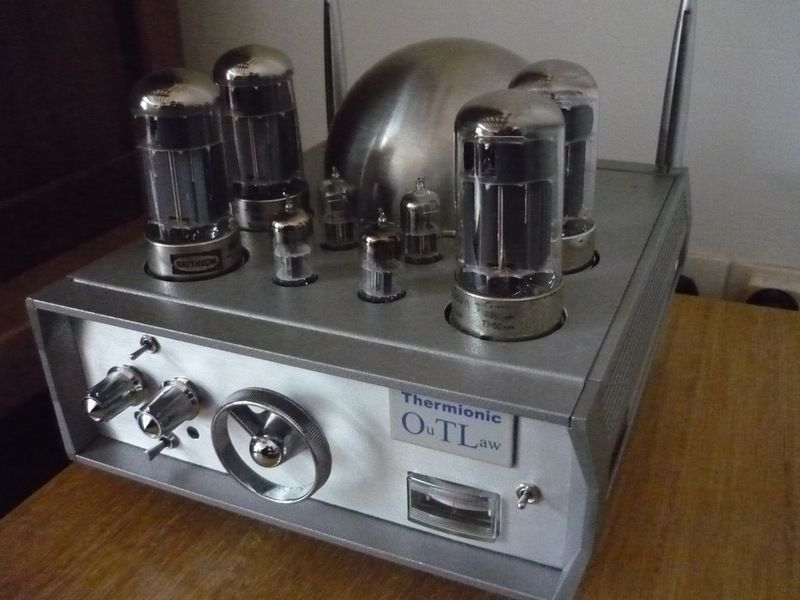
This is the enclosure the amplifier has been built into. With luck I found a hemispherical cover that just fitted the toroidal mains transformer, to further enhance the overall appearance.
The Circuit Design
In reality there are only two configurations for the output of an OTL, single ended push-pull or circlotron. As the power supply requirements of the circlotron approach are rather more complex I opted for the single ended push pull.
I experimented with the simpler single triode phase splitter, aka the cathodyne or split-load, but was unhappy with the reduced output voltage swing achievable for low distortion operation. The long tail pair phase splitter was built followed by another long tail pair providing further gain and the drive to the output stage.
Now here is where I though I could be clever by using local feedback over just this stage, to give the following benefits; limiting the gain so no overall feedback would be required, and reducing the output impedance and improving the linearity of the driver stage. I could also adjust the gain of the one triode slightly, to accommodate the reduced gain of the top output valve.
The performance on the oscilloscope looked fantastic, but as I discovered subsequently it was only with a fixed load resistance that performance was OK. As it turned out I had to revert to overall feedback to accommodate a ‘real’ loudspeaker load, i.e. one that wasn’t a constant resistance (impedance).
The benefits with using long tail pairs are simple circuitry and no undesirable cathode bypass capacitors to colour the sound.
Performance
Well what can I say, astounding clarity, real immediacy to the sound. The frequency response is very wide; nothing seems at all forced or lacking. Just superb!
Here is the finished amplifier without the valve cage fitted:
Alan
Last edited by Firebottle; 10-02-2013 at 14:35. Reason: Transformer cover.
I love Hendrix for so many reasons. He was so much more than just a blues guitarist - he played damn well any kind of guitar he wanted. In fact I'm not sure if he even played the guitar - he played music. - Stevie Ray Vaughan
Fount Master & Moderator
Location: Essex
Posts: 32,041
I'm openingabottleofwine.
Thanks Alan, you are now the second member to make a nomination
I'm sure the 'Studebaker-Chrysler' looks will go down well with the judges.
Thanks again
Barry
 Posting Permissions