+ Reply to Thread
Page 3 of 17 FirstFirst 1234513 ... LastLast
Results 21 to 30 of 161

Thread: Windows to Linux beginer tips.

  1. #21
    Join Date: Aug 2010

    Location: Montseny National Park, Catalonia

    Posts: 3,254
    I'm John.

    Default

    Quote Originally Posted by John View Post
    I be more than willing to give this ago but it sounds like a real head f--k and my computers skills are pretty average
    So if I start to see yes this is easy to install withour hassles I am more than willing to take the plunge so I hope you suceed

    That John is just one of the reasons I strongly suggest you play with Linux on a separate hard drive to your normal Operating System.
    A separate laptop would do fine as well.

    Fitting a second hard drive to a PC tower isn’t difficult and even fitting using one for a laptop that you swap in and out isn’t difficult.

    Given you get the Operating systems for nothing (Bear in mind Win7 or JPlay or even just JRiver cost around the price of a hard drive it doesn’t seem unreasonable)

    At a push you can even install Linux operating systems on external hard drives and run them from there. However, external hard drives connected over USB are likely to run slower with computers using USB. SATA

    external hard drives may perform better for this application.

    In fact, you can pick up a second hand laptop for the price of new Windows operating system or some "audiophile" interconnects.


    It’s fun John…honestly, if you don’t have to worry about stuffing the computer you use on a daily basis.
    Single spur balanced Mains. Self built music server with 3 seperate linear PSU, Intel i5, 16 GB RAM no hard drive (various Linux OS). Benchmark Dac2 HGC, single ended XLR interconnects/Belkin cable. Exposure 21RC Pre, Super 18 Power (recap & modified). Modded World Audio HD83 HP amp. Hand built Monitors with external crossovers , Volt 250 bass & ABR, Scanspeak 13M8621 Mid & Scanspeak D2905/9300 Hi. HD595 & Beyer 880 (600 ohm) cans.

    The whole problem with the world is that fools and fanatics are always so certain of themselves, and wiser people so full of doubts.
    -Bertrand Russel

    John.

  2. #22
    Join Date: Feb 2011

    Location: South Wales

    Posts: 7,487
    I'm the'greatunwashed'.

    Default

    Quote Originally Posted by Welder View Post
    That John is just one of the reasons I strongly suggest you play with Linux on a separate hard drive to your normal Operating System.
    Or use a Virtual Machine maybe? VMPlayer is not too tricky to set up with Ubuntu and it's free, I have one here and fire it up sometimes.

    http://www.vmware.com/products/player/
    "People will hear what you tell them to hear" - Thomas Edison

  3. #23
    Join Date: Mar 2009

    Location: London UK

    Posts: 529
    I'm Chris.

    Default

    OK, using VirtualBox to learm something about Linux may not suit the type of "point and click" Window user you have in mind. But I would argue that anyone with a degree of competence in Windows could install and use VirtualBox. There are a good many tutorials on the web at places like the "How-to Geek" and on youtube. You can downlaod a good guide from here:

    http://www.makeuseof.com/pages/how-to-use-virtualbox

    After all, if I was to produce some kind of guide to installing Linux and its use, I would seriously think about using VirtualBox as the means to generate the screencaps or vids of the various install steps, and when it's at work. You can mess around in VBox and cause no harm.

    So I would suggest a free software solution to help the user move from Windows to Linux, while you would advise adding extra hardware. In which case a degree of hardware competence is required.

    This seems a bit like swings and aroundabouts, but it's good to have choices. Either way the prospective Linux user will have to learn to install and configure thier system.

    PS My preference is for VirtualBox over VMWare's player as VMplayer is not included in any mainstream Linux distro and must be downloaded and installed as 3rd party software and has a habit of breaking with each new iteration of the Linux Kernel and requires patching as described on the Arch Linux WIKI:

    https://wiki.archlinux.org/index.php...VMware_patches
    Last edited by Krisbee; 04-01-2012 at 22:46.
    Chris

    Stuff

    1. Linux PC with onboard HDA SB/ALC892 24/192 optical S/PDIF and/or USB > TC-7520 (Gator + LM4562NA) > Quad 306 > AVI Neutron 3
    2. Rotel RCD 965BX > TC-7520 ( Gator + LM4562NA) > Hd595
    3. Rpi B+/HifiDigi B+ (with isolation transformer) Running "SqueezeOnArch" - https://github.com/SqueezeOnArch
    Nonsense
    1. Belkin Pure AV (white) phono, Belkin Pure AV (silver) USB, QEd 79-strand speaker cable.
    2. MG belden digital co-ax

  4. #24
    Join Date: Feb 2011

    Location: South Wales

    Posts: 7,487
    I'm the'greatunwashed'.

    Default

    Quote Originally Posted by Krisbee View Post
    PS My preference is for VirtualBox over VMWare's player as VMplayer is not included in any mainstream Linux distro and must be downloaded and installed as 3rd party software and has a habit of breaking with each new iteration of the Linux Kernel
    Have you found this yourself Chris?

    The only reason I ask is that I have run the last 3 versions of Ubuntu in VMPlayer without a single issue It's simplicity itself to install. I don't use it often, just to tinker with every now and then and to keep abreast of what each version brings, but for me it's been trouble free.
    "People will hear what you tell them to hear" - Thomas Edison

  5. #25
    Join Date: Mar 2009

    Location: London UK

    Posts: 529
    I'm Chris.

    Default

    I don't mean what runs inside VMplayer, but the VMpalyer software itself. I was talking about installing VMplayer in Linux, and now I realise you were talking about installing VMplayer on Windows, which is indeed straightforward. My misunderstanding.
    Chris

    Stuff

    1. Linux PC with onboard HDA SB/ALC892 24/192 optical S/PDIF and/or USB > TC-7520 (Gator + LM4562NA) > Quad 306 > AVI Neutron 3
    2. Rotel RCD 965BX > TC-7520 ( Gator + LM4562NA) > Hd595
    3. Rpi B+/HifiDigi B+ (with isolation transformer) Running "SqueezeOnArch" - https://github.com/SqueezeOnArch
    Nonsense
    1. Belkin Pure AV (white) phono, Belkin Pure AV (silver) USB, QEd 79-strand speaker cable.
    2. MG belden digital co-ax

  6. #26
    Join Date: Aug 2010

    Location: Montseny National Park, Catalonia

    Posts: 3,254
    I'm John.

    Default

    The trouble here is I can’t really argue with you Chris.
    In fact, I’ve got Virtual Box running here as I type, mainly because I’ve got Ubuntu 11 on my second hard drive and wanted another look at Lubuntu 10.10 while I play with Ubuntu……..ahem.

    Yep, it’s probably true, you’ll have to learn to use a virtual machine, or get good with partitions at some point. Virtual machines are safer I must agree.
    Single spur balanced Mains. Self built music server with 3 seperate linear PSU, Intel i5, 16 GB RAM no hard drive (various Linux OS). Benchmark Dac2 HGC, single ended XLR interconnects/Belkin cable. Exposure 21RC Pre, Super 18 Power (recap & modified). Modded World Audio HD83 HP amp. Hand built Monitors with external crossovers , Volt 250 bass & ABR, Scanspeak 13M8621 Mid & Scanspeak D2905/9300 Hi. HD595 & Beyer 880 (600 ohm) cans.

    The whole problem with the world is that fools and fanatics are always so certain of themselves, and wiser people so full of doubts.
    -Bertrand Russel

    John.

  7. #27
    Join Date: Jun 2011

    Location: Skien, Norway

    Posts: 932
    I'm Jostein.

    Default

    Short description on installing XBMC on a Slackware box:

    http://osarena.net/logismiko/applica...slackware.html
    My hifi system:

    Turntable: Technics SL-1200 MKII, Ortofon 2M Bronze cartridge, Mike New bearing, MCRU PSU (c), Oyaide HS-CF headshell, Oyaide MJ-12 TT mat, Vantage Audio Copper mat, Isonoe Isolation Feet, Isodek IF-2 isolation platform, Furutech Monza LP stabilizer, Herbie's Hal-O JR damper Phono Stage: Hagerman Cornet 3 (prototype) Amplifiers: EAR 868L Preamp, Transcription Audio 211 Heaven Power amp, Bob Carver Cherry 180 power amp CD Player: Ear Yoshino Acute Tuner: Magnum Dynalab 90T Speakers: Vandersteen 2CE SigII, Townshend Audio Super Tweeters, Transcription Audio Speakers Cables and stuff: LFD Audio interconnects and speaker cables, Mark Grant G2000HD, BlackCat Electronics, Van Den Hul Clearwater, Black Rhodium mains cables, Black Rhodium mains block, Finite Elements Resonator, Townhsend Stella Speaker stands, Pro Audio Bono hifi rack, Herbie's spike gliders, Herbie's Ultravox and Hal-O tube dampers, Super Black Hole CD mat Record Cleaning Machine: Loricraft PRC4

  8. #28
    Join Date: Aug 2010

    Location: Montseny National Park, Catalonia

    Posts: 3,254
    I'm John.

    Default

    A Day With Linux (Ubuntu 10.04 and Deadbeef)

    I decided to try out three Linux OS with a view to a simple Linux install capable of bit perfect audio that could replace WinXP as my day to day computing OS.
    I have tried to provide a step by step guide that assumes minimal knowledge and will at the end leave you with a usable all round lightweight operating system that is capable of audio reproduction at your native file bit rate up to whatever your hardware supports.

    I tried 3 Linux Operating Systems.
    Lubuntu 11.10
    I wanted to give this a try mainly because it doesn't come with Pulse audio installed and its supposed to be fast and lightweight.
    Unfortunately when it came to partitioning the drive prior to installation the installer crashed.
    In with the partition manager.
    Second attempt; crashed in configuration..........F**k it! I'll have another go another day.

    Ubuntu 11.10
    Latest flagship release. Was looking good until the installer told me the computer was going to fast for it and declined to carry out any more operations until I had taken the computer outside for a smacking and told it to slow down. Ffs!
    Back in with the partition manager.

    Ubuntu 10.04 LTS
    Still supported and possibly the most bug free. Yeah, this one worked.

    Despite my earlier warnings I did exactly what I advise everyone else to avoid and went for a dual boot set-up on a hard drive already containing WinXP.
    Christmas has taken its toll on the finances and despite having two desk top computers and one and a bit laptops and a dedicated music server, I'm clean out of empty hard drives.

    BEFORE you start, make sure you have anything you cant afford to lose backed up, preferably on an external drive.
    BEFORE you start either write down the login details for your most frequently visited sites or make a file with Notepad in Windows with these details in and put the file in your documents or on to a flash drive.
    BEFORE you start make sure you have a partition manage program the is capable of re-installing Windows MBR (link to a simple one in original post)
    BEFORE you start disconnect and external hard drives. Live installers have a nasty habit of assuming some external drives are where you want Linux installed.
    BEFORE you start, make sure you have a notepad and something to write with close by.
    BEFORE you start make sure you're connected to the internet.
    I'm not sure how Ubuntu copes with SPDIF Dacs but now would be a good time to connect it up. I left my USB Dac connected throughout the installation and it was recognised automatically, one of the reasons 10.04 is a Windows user friendly OS.

    Each operating system was download as an ISO image from the distribution supporting Linux sites.
    Ubuntu, both versions
    http://www.ubuntu.com/download/ubuntu/download
    Pretty straightforward here. Pick your version and click to download.

    Lubuntu
    http://cdimage.ubuntu.com/lubuntu/re...11.10/release/
    You need to take a bit of care in picking the right distribution for your hardware. For most older computers it will be,
    PC (Intel x86) desktop CD

    Each Linux version was checked with an md5 sum checker. This is worth doing considering the time you'll spend sorting out the mess if there is a download error.

    Md5 Sum checker.
    http://download.cnet.com/MD5-Checker...-10410639.html
    https://help.ubuntu.com/community/HowToMD5SUM

    Each operating system ISO file was burnt to individual TDK CD-RW using
    http://cdburnerxp.se/en/home
    which I've used for a while now and copes with ISO images quite well.

    Run your CD burner application, pick Burn ISO image and in the option choose Verify image.
    It takes a while. Remove CD once burnt.

    To use the ISO image installer you need to set your computer to boot from the CD drive rather than the normal hard drive. To do this you need to access a program called BIOS; all computers have one somewhere.
    For most computers you can access BIOS during the boot up process just after the last screen shows on the monitor before the operating system starts up. If you haven't accessed BIOS before a brief search on the internet will tell you which key to press for your particular computer model.

    You will need to shut down the computer and re-start and enter BIOS.
    When in BIOS you navigate the BIOS menu by pressing arrow keys.
    Go to BOOT and move cursor to primary boot drive and press enter.
    By using the arrow keys you can then pick the CD drive as the first Boot device.
    Save and Exit the BIOS menu.
    Your computer will probably automatically re-boot. As soon as the computer sends power to the CD tray, open it and put the CD with the ISO image you've burnt in the tray and close it.


    The Ubuntu 10.04 installer is pretty good for Linux. Most of it is self explanatory.
    You should now boot into the Linux installer. You may have a blank screen for a bit while Linux thinks but be patient.
    You'll be asked if you want to install Linux or run it as a live from the CD. Choose Install.
    Then you'll be asked how you want to install it. Because I'm going for dual boot I picked install alongside Windows.
    If you're installing to an empty drive pick the appropriate installation mode.
    After you've sorted out what language you speak and time zones you'll be asked to partition the drive and a slider you can click on with your mouse and drag around is presented to you.
    If you drag the slider about like a dog on a lead it gets all confuzzeled and pisses off back to Linux so be gentle and know how much room you want to give Linux on your hard drive if installing for dual boot.
    10 Gigabytes is a reasonable starting point.
    You can change the partition size later from within Ubuntu.
    The installer gives you the opportunity to take certain files from your Windows installation if required. It hasn't worked properly on three installations so far. The only thing it managed to transfer was my desktop background.
    At the point where the installer asks if you want to Update during the installation, decline.
    Where you are asked to give a user name and password etc. write all the details down on that pad.
    Hopefully the installer will get on with the job from there on in.

    Once the installation is successfully complete it will open the CD tray and tell you to remove the CD and press Enter.
    Do not be alarmed at all that type that spreads across your screen even if it says lotsa ERROR! Close your eyes and pretend you didn't see it.

    Your computer should now reboot and instead of Windows lighting up you room with happy messages and coloured flags you should get a box with some text giving you the option to start Linux, then a three drive entries showing lines showing a recovery drive for Ubuntu, two swap partitions and maybe unallocated space and right at the bottom, the option to start up Windows.

    I know you're dying to see Ubuntu at this point, but pick Windows. I write this for a couple of reasons; firstly you'll be able to check that Windows boots okay, secondly Windows is now going to start throwing all its dollies out of the pram and is going to want to prod and poke Linux a bit to see if its dangerous.
    Stroke Windows a bit and let it go through the two reboots needed to clam it down.
    First Windows will run a disc check and reboot.
    Then it will start as normal and then decide it needs to prod the Linux installation some more and ask for yet another reboot.
    Sorted, great, now shut the fucker down, ahem I mean shut down the computer and then restart and make sure you go back into BIOS as the computer starts up.
    Go back to the boot section and return the primary drive to first boot position, basically undo what you did before and exit saving changes.

    The computer will re-boot and this time you can pick Ubuntu at the top of the list, just press Enter.
    Interestingly, if you've gone out to get some more valium at this point the computer will boot Ubuntu by default......not so daft after all.

    Log in......................your password is on that notepad
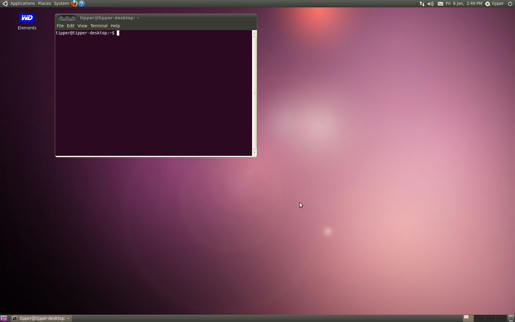
    Linux Ubuntu 10.04!

    URL=http://www.mediafire.com/imageview.php?thumb=5&quickkey=2ai6pp5t1w2c1vb][/URL]


    Wait! Don't rush around clicking stuff just yet.
    The Taskbar should have Update Manager showing, install the updates.
    If the Update Manager doesn't show then go to System>Administration>Update Manager and click on Install Updates.
    If any files don't update properly, make a note of which file/s they were and close Update Manager when its finished. Update Manager will probably want to reboot here. Don't shut down yet.

    There may be at the top right hand side of the bar at the top of the screen an icon near date and time telling you there is a driver for your Graphics Card available. Download it. Once installed it will control the fan on the GFX card and you wont go deaf. Don't shut down yet.
    Next, plug in the external drive with all your music and all that stuff you backed up on it.
    Whatdoyamean Windows has got it another partition on the computer! Ffs, don't you take any of the advice given on this site?
    (this is sortable but not atm)
    This distribution of Ubuntu will auto mount your external hard drive and you should see an icon for it on the desktop.
    Note: In Ubuntu 10.04 some stuff wants double clicking while other stuff doesn't.
    Next, go to System>Preferences>Screen saver and disable screen saver for the time being. If you don't do this it has a horrible habit of blanking the screen out while your thinking about what to click next.
    In that window there is also an option to change Power Management. Click on that and alter the display settings to always on. (you can change all this later)
    Now shut down the computer and let the updates etc install fully.
    Re-start into Ubuntu......it's on the pad

    You'll need Flash Player plug-in at least and doing this stuff now is a good way of getting a bit of a tour of Ubuntu and learning what can do what.
    Applications>Ubuntu Software Centre>Sound & Video.
    You might want to get Adblock for Firefox given you'll probably be looking stuff up; its under the
    >Internet icon.

    Next, Applications>Accessories>Terminal.


    You need to type these commands into the terminal. The easiest way is to copy and paste them in one at a time. The terminal commands should be in showing in green here on AoS to differentiate them here from the rest of the stuff.

    sudo add-apt-repository ppa:alexey-smirnov/deadbeef

    You need to press Enter on your keyboard after each command.
    The terminal will ask for your password.
    Carefully type your password but take note; IT DOESN'T SHOW IN THE TERMINAL so don't panic. Just type it and press Enter on your keyboard.

    sudo apt-get update

    Press Enter

    sudo apt-get install deadbeef

    Press Enter

    Finally the Terminal will ask for a Y to complete. Just type Y and close terminal by clicking on the X in the top left corner when its finished installing.

    Next go to System>Preferences>Sound and click on Sound.
    Make sure Output Sound is un-muted.
    Then choose No Sounds in Sound Theme.

    Next click on the Hardware tab.
    Your Dac should show in this menu.
    (I have tried this with an USB connected HRT Music Streamer, and a Wavelength Proton and both were detected)
    The options here in the sound configuration menu will depend on your sound card/Dac and the type of sound drivers you have installed.
    Basically you want all digital to soundcard/Dac.

    Click on the Digital Stereo Duplex (IEC958) image.
    Then make sure that the Settings below also give Digital Stereo Duplex (IEC958)

    You can ignore the Input tab until you want to record.

    On the Output section, pick your Dac/Soundcard by clicking in the adjacent circle.
    Make sure in each section that the sound is un-muted.
    Close Sound.

    Now go to Applications>Sound & Video and click on DeaDBeef.
    In the Menu bar click on Edit>Preferences.

    The first tab is Sound. Make sure this is set to ALSA Output Plugin.

    Underneath that is Output Device. Set this to your Dac/Soundcard IEC958 (S/PDIF) Digital Audio Output

    In the next tab Playback, make sure Playback Gain is disabled.
    Next go to the Plugins tab and click on the ALSA Output Plugin and tick the box that says Release Device When Stopped. This allows you to use gstreamer for internet audio playback.

    You can play about with the GUI and stuff later.
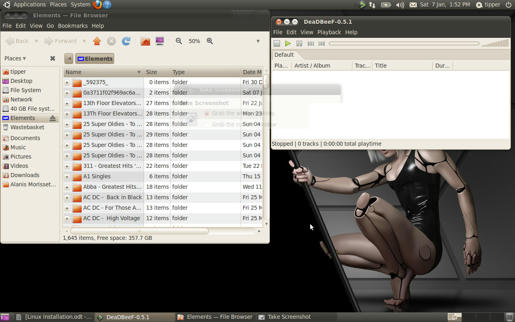
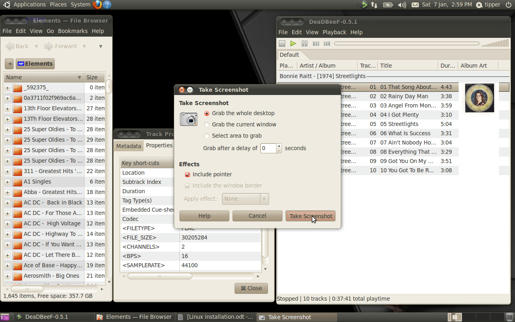
    Leave DeaDBeef open but use your mouse to drag it by the edges (just like Windows) so that the external drive that is displayed on the desktop is visible and all the tabs on DeaDBeef are also still visible.
    Something like this.


    It can get a bit messy from here but this is pretty clever and you'll get the chance to see how much of a bollocks you made of your stored media on the external drive.
    My music is stored on my external drive in a folder structure; one folder per album containing cue sheets, album art, and rip logs.
    Unfortunately DeaDBeef doesn't support this arrangement yet.
    In the Edit tab on DeaDBeef player is a Sort By option; these are the available alternatives of how your music files can be arranged. Dont bother with the Custom srting option at the moment. If you get it wrong DeaDBeef crashes.

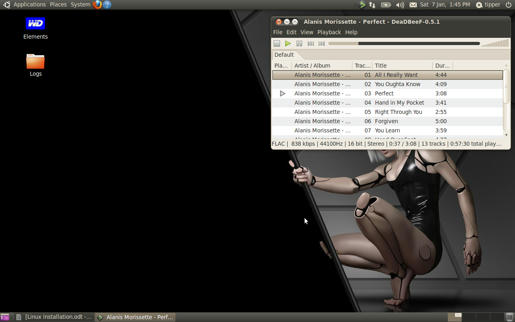
    Now click on your external drive icon on the desktop. In the menu bar at the top is yet another icon showing your external drive; in this case Elements adjacent to Places. Click and hold on this icon and drag it to the empty default playlist area. DeaDBeef will now load all your files into the play-list,
    neat eh

    Right, you need to be careful here. I've stuffed this up to crash point a couple of times so I'll write about what works without hassle.

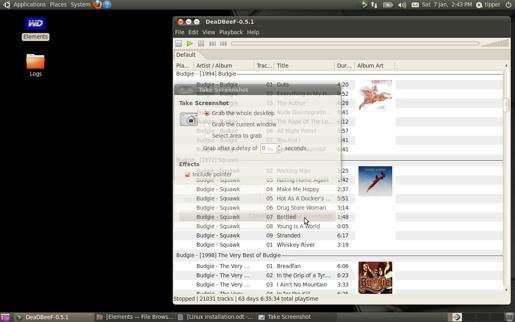
    URL=http://www.mediafire.com/imageview.php?thumb=5&quickkey=vr16qz1n1z2r3g6][/URL]

    Right click in DeaDBeef on the menu bar with Play-list, Artist, Duration etc and select New Column.
    A pop up window appears.
    In the Title type Album Art
    In the Type box choose Album Art
    Choose which side you want.
    Close.


    (hmm, must remember to use the screenshot timer :scratch
    Now if you right click on the Album Art column header you've just made there are alternative arrangements; I don't think you'll like what happens
    If you stuff it all up, just right click the column header again and delete the entire column and start again.

    Alternatively, you can do something like this, where I've left Elements open and used the mouse to drag the sections into shape so that there is an orderly folder structure showing and the default play-list in DeaDBeef is left empty.
    You can then drag the folder you want to listen to into the DeaDBeef playlist area and the album art will still show.
    If you want track properties, click on a track.


    Finally you wont be needing Rhythmbox player so now is a good time to see the third and possibly most useful feature of Ubuntu until you get confident with the Terminal.
    Go to Preferences>System and click on Synaptic Package Manager (SPM).
    Like Windows, deleting stuff by clicking or Add and Remove programs often leaves bits of data in the registry.
    Notice that SPM allows for complete removal.
    Type Rhythbox into the search facility scroll until it show up and mark it for complete removal.
    SPM will show you all the dependant files that will be removed with it; a useful
    feature.
    Click Apply in the main menu.

    Okay, you're good to go.

    What you should have is a relatively lightweight operating system that will still let you play stuff from the internet which is gstreamer dependant and give you native file bit depth and frequency at 16/44.1.
    For further explanation of how ALSA handles audio have a read of Chris's (Krisbee) post above.
    You can play some music now while you wade through my general comments.

    When one considers how long it takes to install a Windows operating system, update, look for various drivers, find and install a music player, get it to avoid the kmixer, this is a piece of cake in comparison
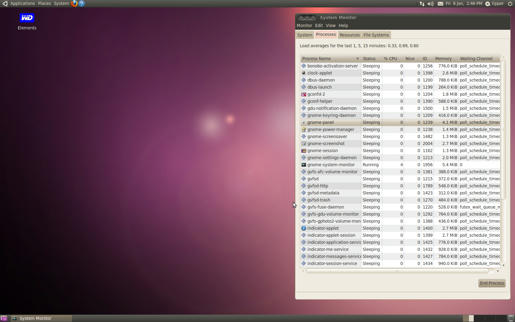
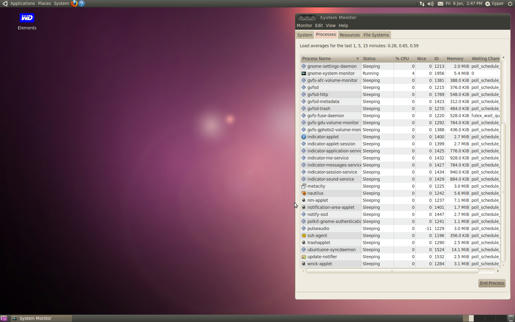
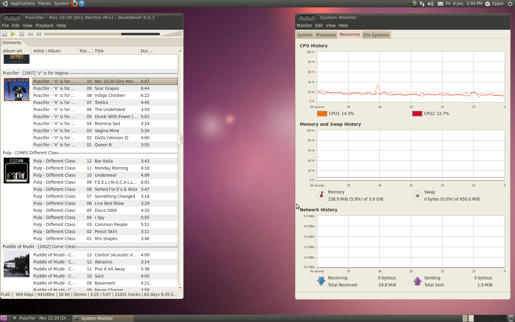
    Looking at the pics, it's interesting to see just how much ISN'T running by default.


    This version of Ubuntu loads as quickly as Windows and shuts down in a fraction of the time.
    I have crashed Ububtu 10.04 a few times now but its due more to me not knowing what I'm doing than system instability.
    DeaDbeef is in my opinion an excellent player. I haven't found anything it wont play and I cant say that even for foobar. Exactly what DeaDbeef is outputting when it plays higher resolution files I can't say atm, but it plays them.

    Okay, Ububntu (generic) isn't as slick as Windows but it has enormous potential for a laptop or main PC media player which you don't need to spend a £100 on and a great many hours of stress just to get it to stop doing stuff.
    I think the sound quality is excellent.
    I'm going to start hacking it about so it's staying as my main OS and Windows will hopefully slowly fade away.


    I hope if you've followed this guide its proved useful......
    …......wee bags of diamonds gratefully received here at AoS
    Single spur balanced Mains. Self built music server with 3 seperate linear PSU, Intel i5, 16 GB RAM no hard drive (various Linux OS). Benchmark Dac2 HGC, single ended XLR interconnects/Belkin cable. Exposure 21RC Pre, Super 18 Power (recap & modified). Modded World Audio HD83 HP amp. Hand built Monitors with external crossovers , Volt 250 bass & ABR, Scanspeak 13M8621 Mid & Scanspeak D2905/9300 Hi. HD595 & Beyer 880 (600 ohm) cans.

    The whole problem with the world is that fools and fanatics are always so certain of themselves, and wiser people so full of doubts.
    -Bertrand Russel

    John.

  9. #29
    Join Date: Sep 2010

    Location: High Peak, Derbyshire

    Posts: 2,241
    I'm Keith.

    Default

    Nice write-up John
    Keith
    Analogue: Lenco L75 with 'PTP5' top plate in heavy birch ply plinth/re-wired Rega RB300/SAE 1000e HOMC Cartridge/Trans-Fi Reso-Mat/Moth RCM
    Files: Voyage MPD/Custom PC/Supra USB/Beresford ASYNCH-1/Beresford TOSlink cable
    CDP: Inca Katana SE
    DAC: Beresford Caiman MkII (LiPo Battery powered)
    Pre-Amp: Croft Micro 25 Power-Amp: Croft Series 7
    Speakers: DIY Frugel-Horn Mk3 ('FH3') + REL Strata subwoofer
    Headphones: Beyer Dynamics DT990 Pro (250 ohm)/Schiit Asgard Headphone Amp
    Cables - Interconnects: Mark Grant G1000HD Speaker Cables: Van Damme Blue
    Mains: Belkin PF30/Mark Grant DSP2.5 & DSP1.0 Rack: Target

    Office System: HP Win8 Laptop/JRiver/MF V-Link2/Beresford Bushmaster MkII/Topping TP20 Mk2/Mission 771e
    Bedroom System: Raspberry Pi/Raspbrian + MPD/HiFiBerry DAC/Topping TP20 Mk2/Mission 760i or DIY Hybrid Valve-MOSFET Headphone amp + Sennheiser HD595


    Gallery

  10. #30
    Join Date: Mar 2009

    Location: London UK

    Posts: 529
    I'm Chris.

    Default

    Quote Originally Posted by keiths View Post
    Nice write-up John
    +1

    That's a Herculian effort, I'm not sure I would have the patience for it.

    Just as aside, as you had looked at Lubuntu, I wonder if you had considered, or knew about, Linux Mint 11 LXDE.

    http://blog.linuxmint.com/?p=1802

    The crux would be how well it deals with installing on a system alongside Windows.
    Chris

    Stuff

    1. Linux PC with onboard HDA SB/ALC892 24/192 optical S/PDIF and/or USB > TC-7520 (Gator + LM4562NA) > Quad 306 > AVI Neutron 3
    2. Rotel RCD 965BX > TC-7520 ( Gator + LM4562NA) > Hd595
    3. Rpi B+/HifiDigi B+ (with isolation transformer) Running "SqueezeOnArch" - https://github.com/SqueezeOnArch
    Nonsense
    1. Belkin Pure AV (white) phono, Belkin Pure AV (silver) USB, QEd 79-strand speaker cable.
    2. MG belden digital co-ax

+ Reply to Thread
Page 3 of 17 FirstFirst 1234513 ... LastLast

Posting Permissions

  • You may not post new threads
  • You may not post replies
  • You may not post attachments
  • You may not edit your posts
  •