Martin Taylor fitted one of the first batch of Bearing Base Plates that I made using the bolting method rather than the epoxy method now used.
He lives near Newbury I believe.

Martin Taylor fitted one of the first batch of Bearing Base Plates that I made using the bolting method rather than the epoxy method now used.
He lives near Newbury I believe.
 Site Owner/Administrator
Location: Wrexham, North Wales, UK
Posts: 110,012
I'm AudioAl'sArbiterForPISHANTO.
Hi Mike,
Done!Originally Posted by CableMaker1

Yup, I use one of the baseplates, but am quite a distance from London. Aside from that, the BBP offers a significant and fundamental sonic improvement for the Technics - and your pictures earlier in this thread show precisely why ...
Marco.
Main System
Turntable: Heavily-modified Technics SL-1210MK5G [Mike New bearing/ETP platter/Paul Hynes SR7 PSU & reg mods]. Funk Firm APM Achromat/Nagaoka GL-601 Crystal Record Weight/Isonoe feet & boots/Ortofon RS-212D/Denon DL-103GL in Denon PCL-300 headshell with Funk Firm Houdini/Kondo SL-115 pure-silver cartridge leads.
Paul Hynes MC head amp/SR5 PSU. Also modded Lentek head amp/Denon AU-310 SUT.
Other Cartridges: Nippon Columbia (NOS 1987) Denon DL-103. USA-made Shure SC35C with NOS stylus. Goldring G820 with NOS stylus. Shure M55E with NOS stylus.
CD Player: Audiocom-modified Sony X-777ES/DAS-R1 DAC.
Tape Deck: Tandberg TCD 310, fully restored and recalibrated as new, by RDE, plus upgraded with heads from the TCD-420a. Also with matching TM4 Norway microphones.
Preamps: Heavily-modified Croft Charisma-X. LDR Stereo Coffee. Power Amps: Tube Distinctions Copper Amp fitted with Tungsol KT-150s. Quad 306.
Cables & Sundries: Mark Grant HDX1 interconnects and digital coaxial cable, plus Mark Grant 6mm UP-LCOFC Van Damme speaker cable. MCRU 'Ultimate' mains leads. Lehmann clone headphone amp with vintage Koss PRO-4AAA headphones.
Tube Distinctions digital noise filter. VPI HW16.5 record cleaning machine.
Speakers: Tannoy 15MGs in Lockwood cabinets with modified crossovers. 1967 Celestion Ditton 15.
Protect your HUMAN RIGHTS and REFUSE ANY *MANDATORY* VACCINE FOR COVID-19!
Also **SAY NO** to unjust 'vaccine passports' or certificates, which are totally incompatible with a FREE society!!!
Top Ranking Member

Location: London
Posts: 4,419
I'm Robert.
I know I'm more than competant enough to do this myself. I fitted my external psu, Mike New bearing and ETP platter without any issues. The bearing baseplate 'feels' a bit more involved going by the instructions I received with it and the instructions and pics on this thread. I really dont think there's much margin for mistakes with dismantling of pcb and gubbings, drilling, gluing with strong epoxy and putting pcb and bits back. I'll tackle it soon as I'm sure it will be a very worthwhile upgrade
Site Owner/Administrator
Location: Wrexham, North Wales, UK
Posts: 110,012
I'm AudioAl'sArbiterForPISHANTO.
You’ll love the effect, Rob.
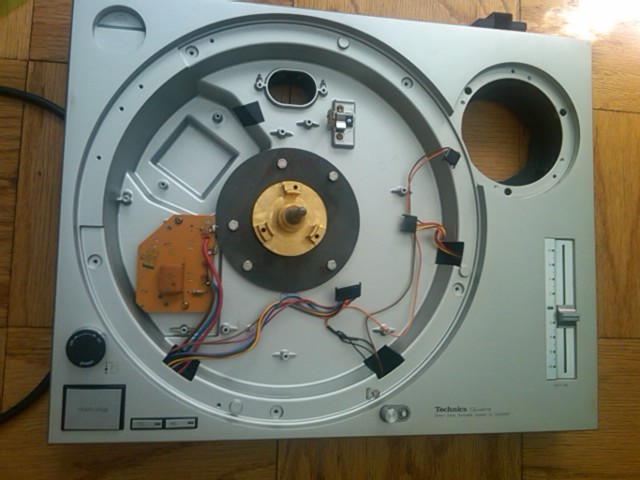
I mean just look at how little of the chassis is properly supporting the bearing, without the BBP in place, as it teeters on the edge of a big hole, ‘floating’ rather precariously on top of three raised screw threads:
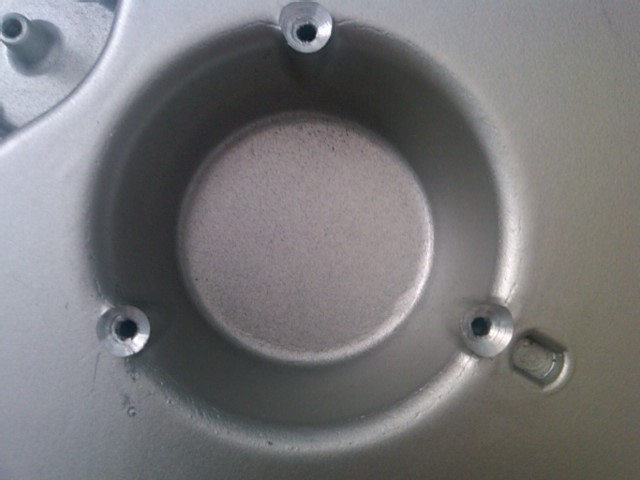
How can that possibly offer a secure foundation for supporting the bearing? It is a fundamental weakness of the Technics, and as is shown below, the BBP solves it:
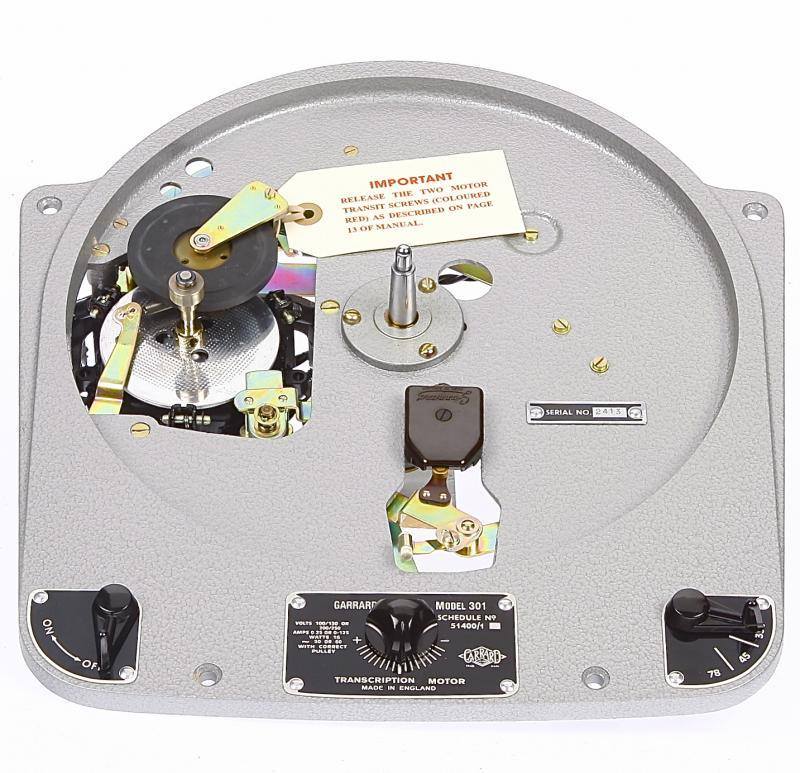
…by allowing the bearing to sit flush on top of the chassis, and thus be firmly coupled to it, as is the case on all other properly engineered high-end turntables, such as for example, on a Garrard 301:
The difference this makes over the stock arrangement on the Technics, in terms of bass weight and authority/lowered noise-floor, has to be heard to be believed!
Marco.
Main System
Turntable: Heavily-modified Technics SL-1210MK5G [Mike New bearing/ETP platter/Paul Hynes SR7 PSU & reg mods]. Funk Firm APM Achromat/Nagaoka GL-601 Crystal Record Weight/Isonoe feet & boots/Ortofon RS-212D/Denon DL-103GL in Denon PCL-300 headshell with Funk Firm Houdini/Kondo SL-115 pure-silver cartridge leads.
Paul Hynes MC head amp/SR5 PSU. Also modded Lentek head amp/Denon AU-310 SUT.
Other Cartridges: Nippon Columbia (NOS 1987) Denon DL-103. USA-made Shure SC35C with NOS stylus. Goldring G820 with NOS stylus. Shure M55E with NOS stylus.
CD Player: Audiocom-modified Sony X-777ES/DAS-R1 DAC.
Tape Deck: Tandberg TCD 310, fully restored and recalibrated as new, by RDE, plus upgraded with heads from the TCD-420a. Also with matching TM4 Norway microphones.
Preamps: Heavily-modified Croft Charisma-X. LDR Stereo Coffee. Power Amps: Tube Distinctions Copper Amp fitted with Tungsol KT-150s. Quad 306.
Cables & Sundries: Mark Grant HDX1 interconnects and digital coaxial cable, plus Mark Grant 6mm UP-LCOFC Van Damme speaker cable. MCRU 'Ultimate' mains leads. Lehmann clone headphone amp with vintage Koss PRO-4AAA headphones.
Tube Distinctions digital noise filter. VPI HW16.5 record cleaning machine.
Speakers: Tannoy 15MGs in Lockwood cabinets with modified crossovers. 1967 Celestion Ditton 15.
Protect your HUMAN RIGHTS and REFUSE ANY *MANDATORY* VACCINE FOR COVID-19!
Also **SAY NO** to unjust 'vaccine passports' or certificates, which are totally incompatible with a FREE society!!!
Senior Member

Location: Westchester, NY, USA
Posts: 202
I'm Mike.
Thanks much Marco!!!
Anyone who thinks CDs sound better needs to listen to my system. Besides, my cables sound better than yours.
Technics SL1200-MK2 SE-1: MN Bearing + Baseplate + AL/CU Platter, Paul Hynes SR7 Power Supply, Isonoe Feet, SME V, Audio Technica AT33EV, CableMaker 1 Tonearm Cable
Technics SL1200-MK2 SE-2: MN Bearing + Baseplate, Copper Mat, Paul Hynes SR7 Power Supply, Isonoe Feet, SME 309, Audio Technica ATOC9/MLII, CableMaker 1 Tonearm Cable
Top Ranking Member
Location: London
Posts: 4,419
I'm Robert.
I agree Marco. The stock arrangement is certainly not ideal for something as robust and well engineered as the MN bearing.
Top Ranking Member
Location: London
Posts: 4,419
I'm Robert.
Right guys, I'm gone in !Stuck at first hurdle
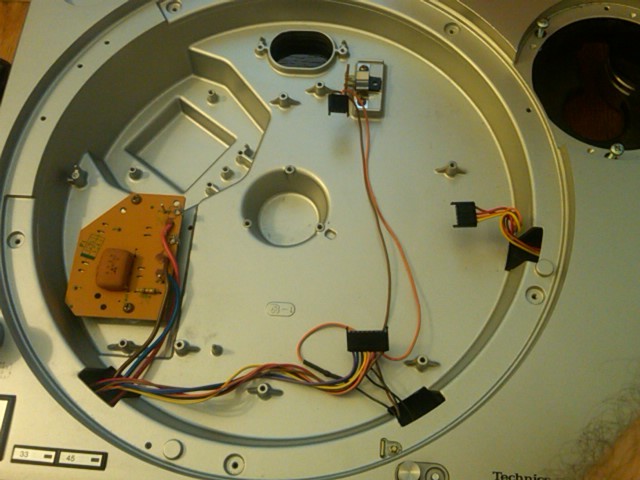
Could someone kindly tell me exactly what Mikes instruction are referring to under Disassembly, item f) it says ' Carefully remove the three plugs attached to the cable forms from the main circuit board. One on each side of the board, (top, bottom and right hand side, when viewed from above.) Note: you may need to clip the cable clamps on the bottom cable form to give more freedom'. Any pics showing this would be much appreciated. As you can imagine, any f ups during this job could prove costly so better extra safe than sorry!
Top Ranking Member
Location: London
Posts: 4,419
I'm Robert.
On a side note. I'm beginning to realise even more just how involved this is and that the pcb and all the wires (basically all the Techies gubbins have to come out and then be re: attached). I'd appreciated advise on the easiest way to do this. (I dont like messing with loads of wires, for fear of mixing them up, plus having to put them all back, but in this case I know I have to and so be it)
Site Owner/Administrator
Location: Wrexham, North Wales, UK
Posts: 110,012
I'm AudioAl'sArbiterForPISHANTO.
One tip, Rob, with wiring, is to take a nice close-up picture of things as they are before you start the dismantling process, then you have a guide as to how they should be when youve finished.
Sorry I cant help you with anything else, but good luck!
Marco.
Main System
Turntable: Heavily-modified Technics SL-1210MK5G [Mike New bearing/ETP platter/Paul Hynes SR7 PSU & reg mods]. Funk Firm APM Achromat/Nagaoka GL-601 Crystal Record Weight/Isonoe feet & boots/Ortofon RS-212D/Denon DL-103GL in Denon PCL-300 headshell with Funk Firm Houdini/Kondo SL-115 pure-silver cartridge leads.
Paul Hynes MC head amp/SR5 PSU. Also modded Lentek head amp/Denon AU-310 SUT.
Other Cartridges: Nippon Columbia (NOS 1987) Denon DL-103. USA-made Shure SC35C with NOS stylus. Goldring G820 with NOS stylus. Shure M55E with NOS stylus.
CD Player: Audiocom-modified Sony X-777ES/DAS-R1 DAC.
Tape Deck: Tandberg TCD 310, fully restored and recalibrated as new, by RDE, plus upgraded with heads from the TCD-420a. Also with matching TM4 Norway microphones.
Preamps: Heavily-modified Croft Charisma-X. LDR Stereo Coffee. Power Amps: Tube Distinctions Copper Amp fitted with Tungsol KT-150s. Quad 306.
Cables & Sundries: Mark Grant HDX1 interconnects and digital coaxial cable, plus Mark Grant 6mm UP-LCOFC Van Damme speaker cable. MCRU 'Ultimate' mains leads. Lehmann clone headphone amp with vintage Koss PRO-4AAA headphones.
Tube Distinctions digital noise filter. VPI HW16.5 record cleaning machine.
Speakers: Tannoy 15MGs in Lockwood cabinets with modified crossovers. 1967 Celestion Ditton 15.
Protect your HUMAN RIGHTS and REFUSE ANY *MANDATORY* VACCINE FOR COVID-19!
Also **SAY NO** to unjust 'vaccine passports' or certificates, which are totally incompatible with a FREE society!!!
Top Ranking Member
Location: London
Posts: 4,419
I'm Robert.
Great idea Marco - Thanks, Will defo do that. Looking down at my pcb with all the wires / plugs attached, I can see that I basically need to carefully unplug the plugs from the pcb and unsolder the wires which come from the external ps to the circuit board as per the instructions. Then unscrew the three black screws which hold the bearing in place and carefully lift the circuit board upwards and remove the bearing. Not gonna rush any of this. Pity it's dark now as I have to be at my sisters for 7pm to celebrate my twin niece and nephews birthday so I'll tackle this a bit at a time, as and when time permits
 Posting Permissions
 Reply With Quote